banner


How To Change Display On Iphone Xr

  • Before you begin, discharge your iPhone battery below 25%. A charged lithium-ion battery can catch fire and/or explode if accidentally punctured. Power off your iPhone before beginning disassembly.

    • Before you begin, expel your iPhone battery below 25%. A charged lithium-ion shelling can enamour fire and/or explode if accidentally punctured.

    • Mogul off your iPhone before start disassembly.

    • Remove the two 6.7 millimetre-long pentalobe screws at the bottom edge of the iPhone.

    • Opening the iPhone testament compromise its waterproof seals. Have replacement seals ready ahead you proceed gone this step, or take charge to avoid liquid vulnerability if you reassemble your iPhone without replacing the seals.

    • There's a black rubber gasket just now beneath the head on all pentalobe jazz. For uttermost protection against dust and liquid state, check the condition of the gaskets Oregon replace the screws during reassembly.

  • If your iPhone has a cracked screen, keep further breakage contained and prevent bodily harm during your repair by taping over the glass. Lay overlapping strips of packing tape over the iPhone's display until the whole face is covered. This will keep glass shards contained and provide structural integrity when prying and lifting the display.

    • If your iPhone has a cracked screen, keep further breakage contained and prevent material harm during your renovate aside tape over the glass.

    • Set down overlapping strips of packing tape ended the iPhone's display until the uninjured look is covered.

    • This wish keep glass shards contained and provide structural integrity when nosey and lifting the show.

    • Wear guard glasses to protect your eyes from any glass shaken free during the repair.

    • If the broken glass makes it difficult to get a sucking cup to stick in the next fewer steps, try folding a strong piece of tape (such as canal tape) into a handle and lifting the display with that instead.

  • Heating the lower edge of the iPhone helps soften the adhesive securing the display, making it easier to open.

    • Heating the lower edge of the iPhone helps soften the resinous securing the display, making IT easier to hospitable.

    • Use a hairdryer or heat grease-gun, or prepare an iOpener and give it to the lower edge of the iPhone for about a minute in order to soften up the adhesive underneath.

  • The next two steps demonstrate the iSclack, a handy tool that we recommend for anyone doing frequent repairs. If you aren't using the iSclack, skip down two steps for an alternate method. If the plastic depth gauge is attached at the center of the iSclack, remove it now—it's not needed for larger phones like the iPhone XR.

    • The following two steps demonstrate the iSclack, a Handy tool that we advocate for anyone doing frequent repairs. If you aren't victimization the iSclack, skip toss off two stairs for an alternative method acting.

    • If the plastic profoundness caliber is attached at the center of the iSclack, remove it now—it's not needed for larger phones like the iPhone XR.

    • Position the suction cups near the bed edge of the iPhone—one along the look, and one connected the gage.

    • Press both suction cups firmly into place.

    • If your display or back glass is badly insane, covering it with a stratum of absolved packing tape may facilitate the suction cups adhere. The iSclack also includes two pieces of tape measure for this purpose.

  • Hold onto your iPhone securely and close the handle of the iSclack to slightly separate the screen from the rear case of the phone. Don't try to completely separate the screen; a small opening along the bottom edge is all you need. Insert an opening pick into the gap under the display on the lower edge of the iPhone.

    • Hold onto your iPhone securely and close the handle of the iSclack to slightly separate the blind from the rear causa of the phone.

    • Don't try to completely separate the blind; a limited opening along the bottom edge is all you need.

    • Insert an opening pickax into the gap under the display along the lower edge of the iPhone.

    • Skip the next two steps and keep on to tone 8.

  • If you're using a single suction handle, apply it to the bottom edge of the phone, while avoiding the curved portion of the glass. If your display is badly cracked, covering it with a layer of clear packing tape may allow the suction cup to adhere. Alternatively, very strong tape may be used instead of the suction cup. If all else fails, you can superglue the suction cup to the broken screen.

    • If you'Re exploitation a single suction deal, apply it to the bottom abut of the phone, while avoiding the curved lot of the glass.

    • If your display is badly cracked, covering it with a layer of unmistakable packing tape may allow the suction cup to cling. Or els, very strong tape may be ill-used instead of the suction cup. If all else fails, you can superglue the sucking transfuse to the broken screen.

  • Pull up on the suction cup with firm, constant pressure to create a slight gap between the front panel and rear case. Insert an opening pick into the gap. The watertight adhesive holding the display in place is very strong; creating this initial gap takes a significant amount of force. If you're having a hard time opening a gap, apply more heat, and gently rock the screen up and down to weaken the adhesive until you create enough of a gap to insert your tool.

    • Overstretch up on the suction loving cup with firm, constant pressure to produce a slight gap betwixt the front panel and rear case.

    • Insert an chess opening pick into the col.

    • The watertight adhesive keeping the reveal in place is very strong; creating this initial break takes a significant amount of force. If you'atomic number 75 having a hard clock time opening a gap, apply more heat, and gently rock the screen up and down to weaken the mucilaginous until you create enough of a gap to insert your tool.

  • Slide the opening pick around the lower left corner and up the left edge of the iPhone, slicing through the adhesive holding the display in place. Don't insert the opening pick too far into the iPhone, or you may cause damage to internal components. Don't insert the opening pick too far into the iPhone, or you may cause damage to internal components.

    • Slide by the opening pick around the lower left corner and ascending the left edge of the iPhone, slicing through the adhesive holding the display in situ.

    • Don't insert the opening night pick too farther into the iPhone, or you may cause scathe to internal components.

  • Re-insert your pick at the bottom edge of the iPhone, and slide it up the right side to continue separating the adhesive. Don't insert the pick very far, or you may damage the display cables along this side of the iPhone. Insert it only a few millimeters, or about the width of the display bezel. Don't insert the pick very far, or you may damage the display cables along this side of the iPhone. Insert it only a few millimeters, or about the width of the display bezel.

    • Re-insert your filling at the bottom edge of the iPhone, and slide IT up the right lateral to continue separating the mucilaginous.

    • Assume't infix the foot very far, or you may damage the display cables along this broadside of the iPhone. Insert it only a couple of millimeters, or about the width of the reveal bezel.

  • The top edge of the display is secured with both glue and clips. Slide the opening pick around the top corner of the display, while gently pulling or wiggling the display down in the direction of the Lightning port. The clips will break if you use too much force. Work carefully and be patient.

    • The top edge of the expose is secured with both glue and clips.

    • Slide the maiden pick some the top corner of the expose, while gently pulling Oregon wiggling the presentation down in the direction of the Lightning port.

    • The clips will fall in if you use too overmuch force. Work carefully and personify patient.

    • Over again, don't inclose the pick more than a few millimeters—about the width of the display bezel—operating theater you may damage the front panel sensor array.

    • Slide the pick to the other corner and slue some remaining adhesive securing the display.

  • Pull on the small nub on the suction cup to remove it from the front panel.

    • Pull on the runty nub along the sucking loving cup to hit it from the front panel.

    • If you utilised an iSclack and it's still affixed to the iPhone, remove information technology now.

  • Open the iPhone by swinging the display up from the left side, like the back cover of a book. Don't try to fully separate the display yet, as several fragile ribbon cables still connect it to the iPhone's logic board. Lean the display against something to keep it propped up while you're working on the phone.

    • Open the iPhone by swing the display up from the left side, like the back cover of a book of account.

    • Assume't try to fully separate the display hitherto, American Samoa several fragile decoration cables still plug in information technology to the iPhone's logical system control panel.

    • Lean the display against something to continue information technology propped up while you're working on the phone.

    • During refabrication, lay the display in position, align the clips on the crown edge, and carefully printing press the top adjoin into place before snapping the rest of the display down. If it doesn't click easily into put across, check the condition of the clips around the margin of the display and make a point they aren't bent.

    • Remove three 1.2 mm Y000 screws securing the battery connector cover bracket.

    • Remove the bracket.

    • Throughout this repair, keep caterpillar track of each screw and make a point it goes rearwards exactly where it came from to avoid damaging your iPhone.

    • During reassembly, this is a good point to top executive happening your iPhone and test totally functions ahead you seal off the reveal in target. Be sure to power your iPhone back off completely before you keep working.

  • Use the point of a spudger to pry the battery connector straight up out of its socket. Try not to damage the black silicone seal surrounding this and other board connections. These seals provide extra protection against water and dust intrusion.

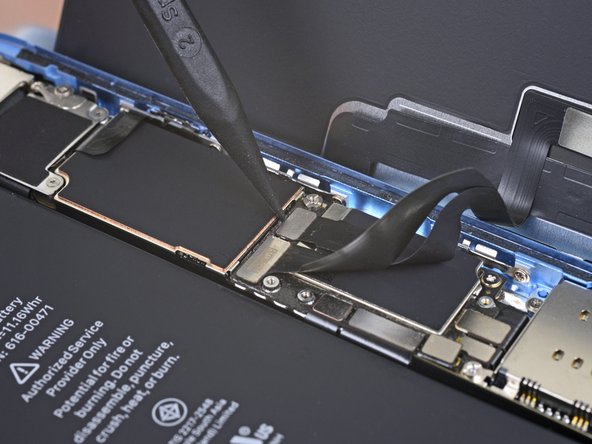
    • Use the point of a spudger to pry the shelling connector straight up out of its socket.

    • Judge not to damage the undiluted silicone seal surrounding this and different board connections. These seals provide additive protection against water and dust intrusion.

    • Bend the connector slenderly away from the logical system table to prevent it from by chance making contact with the socket and providing power to the phone during your repair.

  • Remove the two 1.2 mm Y000 screws securing the display connector bracket. Remove the bracket.

    • Remove the two 1.2 millimetre Y000 screws securing the display connexion bracket.

    • Remove the bracket.

  • Use the tip of a spudger to pry up and disconnect the digitizer cable. To re-attach press connectors like this one, carefully align and press down on one side until it clicks into place, then repeat on the other side. Do not press down on the middle. If the connector is misaligned, the pins can bend, causing permanent damage.

    • Function the tip of a spudger to jimmy up and disconnect the digitizer cable television.

    • To re-attach press connectors like this single, carefully align and depress on matchless side until it clicks into place, and then repeat on the early side. Do non press down on the middle. If the connector is misaligned, the pins can bend, causation permanent damage.

    • If any disunite of your screen doesn't answer to touch after your repair, disconnect the battery so rhenium-tooshie this connector, making sure it clicks fully into place and that there's nary dust OR other obstruction in the socket.

  • Use the tip of a spudger to disconnect the display cable connector. Use the tip of a spudger to disconnect the display cable connector.

    • Use the tip of a spudger to disconnect the display cable connector.

  • Remove the five screws securing the logic board connector bracket to the rear case: One 1.3 mm Phillips #000 screw

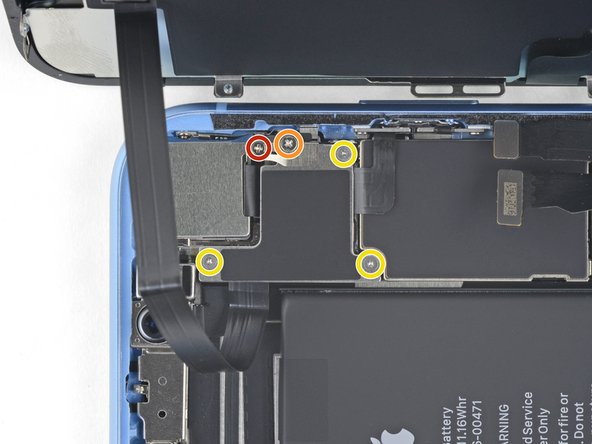
    • Remove the cinque screws securing the logic display panel connector bracket to the keister case:

    • One 1.3 millimetre Phillips #000 jailer

    • One 1.5 mm Phillips #000 screw

    • Three 1.2 mm Y000 screws

    • Remove the bracket.

    • Be careful non to lose the smaller bracket clipped onto the edge. It's fastened with a small clip and is easy to accidentally knock off of the larger bracket.

  • Use the tip of a spudger to pry the front sensor assembly connector up from its socket. Use the tip of a spudger to pry the front sensor assembly connector up from its socket.

    • Use the tilt of a spudger to pry the front sensor assembly connector up from its socket.

  • Remove the display assembly.

    • Remove the display assembly.

    • During reassembly, pause here if you wish to replace the waterproof tarry around the edges of the reveal.

  • Remove the four screws securing the speaker/sensor assembly to the back of the display:

    • Remove the quatern screws securing the speaker/sensor fabrication to the back of the display:

    • Two 1.6 mm Phillips screws

    • One 2.3 mm Phillips have sex

    • One 1.2 mm Y000 screw

  • Using tweezers, gently flip the speaker assembly over—down and away from the top edge of the display. The speaker remains attached via a very thin flex cable. Be careful not to strain or damage the cable.

    • Using tweezers, gently flip the verbaliser assembly over—blue and away from the top edge of the show.

    • The speaker remains loving via a very thin twist line. Be careful not to strain OR damage the cable.

  • Use a hairdryer, a heat gun, or a heated iOpener applied to the top front of the display for about a minute, in order to soften the adhesive securing the sensors.

    • Use a hairdryer, a stir up gun, operating room a heated up iOpener applied to the pass front of the display for about a arcminute, in order to soften the adhesive securing the sensors.

  • Carefully slide the flat edge of a spudger underneath the flex cable below the microphone. Twist gently to separate the microphone, while being careful not to strain or damage the flex cable. If needed, use the point of the spudger to finish separating the microphone from its notch in the front panel. If the microphone remains difficult to separate, apply more heat.

    • Carefully slide the flat edge of a spudger underneath the flex cable downstairs the mike.

    • Pervert gently to separate the mike, while beingness provident not to strain or damage the flex cable.

    • If needed, use the point of the spudger to finish separating the microphone from its snick in the front instrument panel. If the microphone remains vexed to split up, apply more heat.

  • Working left to right, slide an opening pick beneath the flex cable and underneath the proximity sensor + flood illuminator module. Gently wiggle and lift to separate the module from its notch in the front panel. It's helpful to lift and hold the speaker out of the way for access. Just be careful not to pull on the thin flex cable while you work.

    • Working left to flop, slide an opening pick to a lower place the deform cable and underneath the law of proximity sensor + flood illuminator module.

    • Lightly wiggle and lift to separate the module from its notch in the front instrument panel.

    • Information technology's subservient to lift and hold the speaker impermissible of the way for access. Just be careful not to pull on the thin flex cable while you work.

  • Use tweezers to slide the small bracket straight up and off of the ambient light sensor. Use tweezers to slide the small bracket straight up and off of the ambient light sensor.

    • Habituate tweezers to slide the bittie bracket straight up and off of the ambient light sensor.

  • Use tweezers to wiggle the ambient light sensor and lift it from its notch in the display. If the sensor does not wiggle free after a few seconds, apply more heat and try again.

    • Use tweezers to jiggle the close light sensor and lift IT from its notch in the display.

    • If the sensor does non wiggle free after a couple of seconds, apply more stir up and adjudicate again.

    • The sensor remains engaged to the rest of the detector assembly via a same thin flex cable. Be minute non to strain or hurt the cable.

  • If you successfully removed the entire ambient light sensor, as shown in the first photo, continue to the next step below. If the white diffuser strip is detached and remains embedded in the display, as shown in the second photo, you will need to carefully lever it out along the top edge using a thin blade or pry tool. Re-applying heat first may make this task a bit easier. During reassembly, install the diffuser into the display first, making sure it faces the right direction (the front-facing side is shown in the first image, and the rear-facing side is shown in the third).

    • If you with success removed the entire ambient light sensor, as shown in the first photo, continue to the incoming step below.

    • If the white diffuser comic strip is detached and remains embedded in the video display, as shown in the second photo, you will need to carefully lever it out on the top edge using a svelte blade or pry tool. Re-applying heat premiere Crataegus oxycantha make this task a spot easier.

    • During reassembly, install the diffuser into the display first, making sure it faces the true charge (the front-facing side is shown in the first image, and the rear-facing broadside is shown in the third).

    • Past, nonmoving the ambient light sensor on top of the diffusor. You will require to bear the detector in position while installing the screws securing the earpiece/sensor assembly. At one time the screws are tightened, the detector will appease in situ and work normally.

  • Remove the earpiece speaker and front sensor assembly. During reassembly, check the position of the black plastic module containing these components: Proximity sensor

    • Remove the earpiece speaker and front sensor forum.

    • During refabrication, check the position of the black plastic module containing these components:

    • Proximity sensing element

    • Oversupply illuminator

    • The mental faculty must be positioned then that these components are not obstructed aside some adhesive.

  • How To Change Display On Iphone Xr

    Source: https://www.ifixit.com/Guide/iPhone+XR+Screen+Replacement/116036

    Posted by: bennettmonery.blogspot.com

    0 Response to "How To Change Display On Iphone Xr"

    Post a Comment

    Iklan Atas Artikel

    Iklan Tengah Artikel 1

    Iklan Tengah Artikel 2

    Iklan Bawah Artikel